
Table of Contents
- 1 Frame of Reference
- 2 The Elephant in the Room
- 3 My Path
- 4 How
- 4.1 Choose the most cost-effective, performant, and secure CSP
- 4.2 Provision a compute instance with a free shape and with valid networking
- 4.3 Install and configure a self-hosted WordPress instance to the compute instance.
- 4.4 Configure TLS/SSL Encryption (i.e., HTTPS)
- 4.5 Go through the famous five-minute WordPress installation process.
- 4.6 Install plugins for security hardening, faster performance, and resilience.
- 5 Finalmente
- 6 Supplementary
Updated on 9.6.2025: Small amends such as reducing the amount of “speaking in absolutes” and fixing links so that they open in new tabs.
Updated on 20.12.2024: I added another useful plugin called WPS Hide Login to change the default WordPress login URL as an additional security layer combined with Limit Login Attempts Reloaded.
Frame of Reference
Today, in the 21st century, it’s not difficult at all to create your own websites. In the majority of cases, it’s not even expensive. Everybody can do it! The real difficulty lies in how you go about doing it. For example, consider this table:
| EASY | NORMAL | HARD |
|---|---|---|
| Plug and Play Content Management Systems (e.g., Medium, Substack, Squarespace, and WordPress.com) | WordPress.org (self-hosted) | Vanilla (CSS/HTML/JS) |
| Buying a personalized solution from Fiverr. | Static Site Generators (e.g., Hugo and Jekyll) | Front end (e.g., React) with or without a back end (e.g., NodeJS) |
This table should provide a very basic frame of reference for choosing the path of least (or most) resistance. For example, the easiest way for you to erect your own blogging site is through Medium: Just sign up with Google (or maybe don’t) and click the “Write” button. Substack is very similar.
Want more personalization options while preserving simplicity? WordPress.com and Squarespace are your friends. Both can be personalized to fit your needs uniquely. They don’t have that basic Medium or Substack look.
People who are tech-savvy, tinkerers, concerned with privacy, and/or have more time on their hands should look for a self-hosted option like WordPress.org, Hugo1, or perhaps endeavor into an entire full stack implementation.
The Elephant in the Room
Pricing. Sure, those 3rd party hosted solutions like WordPress.com, Medium, Substack, and Squarespace are simple and the time to market (TTM) is very fast. But they’re not entirely free (at least in the personalization department). Check out this new and revolutionary table:
| PRODUCT | COST |
|---|---|
| Medium | Writing and publishing blog posts is entirely free but collaborative publications (think of these like magazines) and custom domains (e.g., karnavaara.com) are only available for paid members ($5/month). |
| Squarespace | Minimum cost is 11€/month (that is, if it’s paid annually) |
| Substack | Everything is free for writers. However, you have to pay a one-time fee of $50 for the ability to use a custom domain. |
| WordPress.com | Basic usage (e.g., writing and publishing posts) is entirely free. 4€/month will enable the use of custom domains. Personal branding will require custom styles, which will cost 8€/month. Having the ability to use plugins (which is arguably the most important feature) will cost 25€/month. |
So, if you want to get your posts to the market hastily and cost-effectively, and you don’t care about personal branding, I recommend Medium or Substack. If you’re like me and desire personal branding, the choice would be between Squarespace and WordPress.com.
My Path
Static Site Generators
The simplicity and aesthetic of Static Site Generators (SSG) like Hugo took me by storm. If you’ve even slightly dabbled in web development, setting up a full-fledged Hugo blog with a ready-to-use theme will take only an hour (if even that).2 At the other side of the spectrum is full stack development but sadly I don’t have the time to pursue that endeavor.
Unfortunately… I won that storm and decided to join the battle between Squarespace and 3rd party hosted WordPress. Why? Well, first of all, out of curiosity, and last of all, for laziness. I got an epiphany and WordPress just happened to have the perfect theme.
The discovery of perfection-ish.
Even though I found “perfection” in WordPress, the choice between it and Squarespace was somewhat difficult. Squarespace provides Search Engine Optimization (SEO) straight out of the box while in WordPress you can only achieve the same with plugins. Additionally, Squarespace has unlimited storage, which none of the WordPress plans have.
My choice boiled down to Squarespace’s Business plan (17€/month annually) and WordPress’s Business (24€/month annually). The Squarespace business plan would give me complete customization with CSS and JavaScript, SEO, and unlimited storage. The WordPress business plan would enable plugins (e.g., Yoast SEO), which have a plethora of use cases.
Ultimatum
I really wanted the plugins… But 24€/month for my own personal blog3, which doesn’t generate any direct revenue (though I believe it does indirectly). Then again, going with Squarespace and saving 7€/month isn’t the saving grace. WordPress won, but with an ultimatum: We use the entirely free and self-hosted version of WordPress.
Why the ultimatum? I had an idea how to get the business version of WordPress for only pennies. Additionally, I have played around with Docker, Linux, different Cloud Service Providers (CSPs), and Networking so this wasn’t going to be a big undertaking.
How
First, come up with a plan of action. However, to do that, you must have a relatively good bird’s eye view on a top level, which only develops through experience. Here’s a very bare-bones representation of one, although more akin to a list of actions:
- Choose the most cost-effective, performant, and secure CSP.
Hetzner Cloud?Although cheap, the VMs aren’t free.Amazon Web Services?VMs are only free up to a point.Azure?Similar to AWS.- Google Cloud Provider (GCP)? There’s an always-free instance in certain regions but it’s very weak.
- Oracle Cloud Infrastructure (OCI)? There are multiple always-free shapes for instances (one of which can be very powerful).
- Provision a compute instance with a free shape and with valid networking.
- Install and configure a self-hosted WordPress instance to the compute instance.
Setting it up all vanilla style with a Virtual Machine (VM) without using a Container Runtime (e.g., Docker)?Blasphemy… Just kidding 🙂 This would be too much of an overkill4- Using preconfigured and prebuilt WordPress Docker Images5?
- Configure TLS/SSL Encryption (i.e., HTTPS).
- Go through the famous five-minute WordPress installation process.
- Install plugins for security hardening, faster performance, and resilience.
This list is very high level and is probably abstract for someone inexperienced. But I’ll go from abstract to concrete in detail. So, let’s get started!
Choose the most cost-effective, performant, and secure CSP
As you might have picked up from the action plan, there are really two choices: Google Cloud Provider or Oracle Cloud Infrastructure. If you went through the links, you’d conclude that OCI’s the clear winner here:
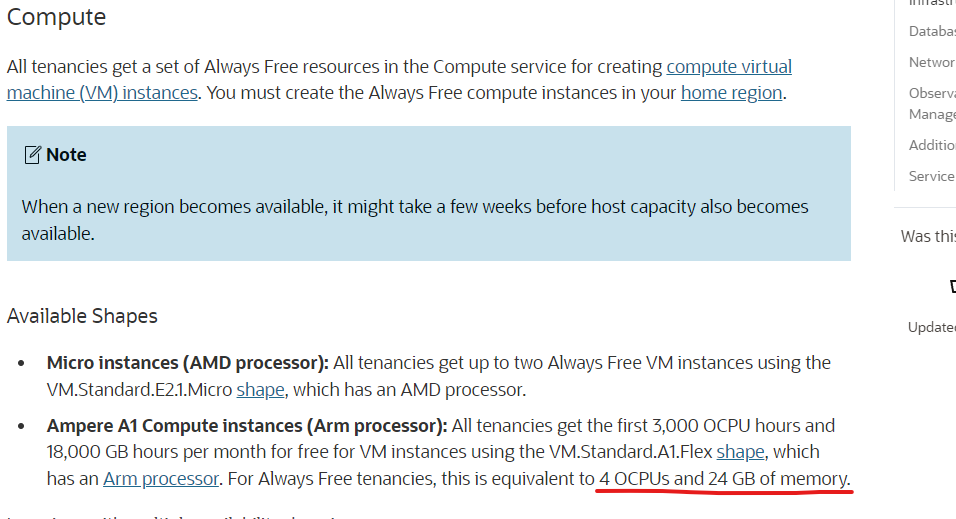
The perspicacious of you will notice that this is a compute instance with an Arm processor instead of an AMD one. For our use case, this won’t be a problem as Docker can be installed on Arm Linux distributions and there are Arm compatible Docker images for WordPress and MySQL. Especially for the cloud, I think Arm processors will be the future.
Provision a compute instance with a free shape and with valid networking
Compute instance
If you haven’t already, you need to create an OCI account. This will require a credit card as Oracle wants to confirm your identity and prevent the misuse of their cloud.
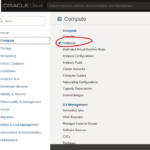
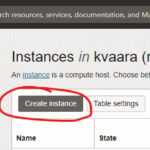
After creating your account and logging into OCI, do these steps below:


A pro tip regarding the SSH key…
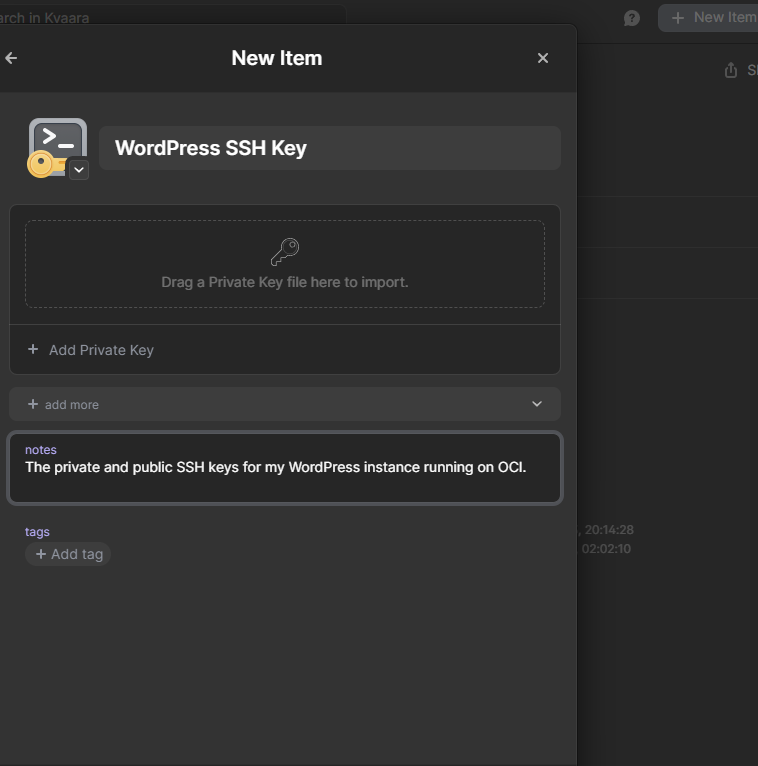
In my opinion, it’s a major mistake to save the SSH key locally without any encryption. You should use a centralized Password Manager like KeePass, LastPass, or 1Password. I personally use 1Password as their security model is top-notch.
With 1Password you can effortlessly and pleasingly save your private SSH keys as seen in the picture below. You can even create your own taxonomy by using tags and categories.
Afterward, in the 1Password Windows application, you can set up the 1Password SSH Agent, which you can use in your Git and SSH workflows. What makes this feature brilliant is that it won’t leak your private SSH keys outside the application during usage:

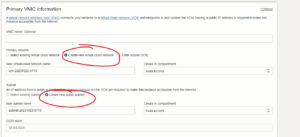
Before you create the instance by clicking the button at the bottom, take a look at the “Summary” panel situated on the bottom right.
Where the Pennies Come From
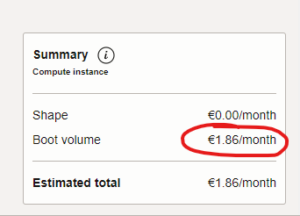
This is the reason why the title of this post doesn’t have the words “For Free” but “For Pennies”. The shape itself will be free even if it’s running 24/7/365. The only costs will be from storage (boot volume in this context) and data egress leaving the Virtual Cloud Network (VCN). Although, in practice, you will probably only pay for using storage as the first 10 TB of data egress in OCI is free per month.
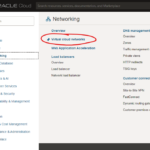
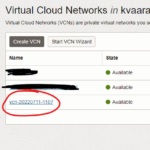
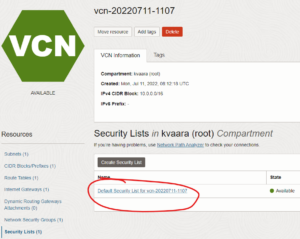
You can now create the instance. After creating it, you must edit the VCN’s Security Lists and add a rule to allow ingress traffic to the instance. Ingress is, by default, blocked in OCI with a few exceptions.
Allowing HTTPS traffic
Here’s another set of steps to do:

If you don’t want to configure TLS/SSL for your WordPress server, you need to add a rule allowing HTTP (TCP port 80). However, it’s of utmost importance you set up TLS/SSL. If you don’t, the traffic will be unencrypted and everybody visiting your WordPress site will see it as unsecure. I’ll show you how you can do this.
Install and configure a self-hosted WordPress instance to the compute instance.
Why Docker?
As mentioned in the plan of action, you can do this with or without Docker. However, I’m going to use Docker as the container runtime for the simplicity, familiarity, and orchestration it provides.
SSH into the provisioned compute instance with the private key you saved. If you’re on Windows you can do this via PuTTY or Windows Subsystem for Linux (WSL). I recommend WSL as it enables you to use OpenSSH (the de facto SSH protocol). Via SSH, install Docker Engine by following the instructions found on Docker docs.
A great thing about Docker is that it comes with its own native container orchestration tool called Docker Compose, which is much simpler and more lightweight than Kubernetes. We’re going to use Docker Compose to install and configure WordPress.
Docker Composing WordPress
Create a file called docker-compose.yml using a Command Line Text Editor like Nano or Vim:
nano docker-compose.ymlAdd the following contents to it remembering to change the placeholders properly:
version: '3.8'

services:
  wordpress:
    image: arm64v8/wordpress
    restart: always
    ports:
      - 443:443
      - 80:80
    environment:
      WORDPRESS_DB_HOST: db
      WORDPRESS_DB_USER: <DB_USER_HERE>
      WORDPRESS_DB_PASSWORD: <DB_PASSWORD_HERE>
      WORDPRESS_DB_NAME: <DB_NAME_HERE>
    volumes:
      - wordpress:/var/www/html
  db:
    image: arm64v8/mysql
    restart: always
    environment:
      MYSQL_DATABASE: <DB_NAME_HERE>
      MYSQL_USER: <DB_USER_HERE>
      MYSQL_PASSWORD: <DB_PASSWORD_HERE>
      MYSQL_RANDOM_ROOT_PASSWORD: '1'
    volumes:
      - db:/var/lib/mysql

volumes:
  wordpress:
  db:
As you can see, we will compose two containers: WordPress and a MySQL database. Both of them are going to be based on the arm64v8 architecture. Why MySQL? Because a database is a hard requirement for WordPress. Without a relational database like MySQL or PostgreSQL, there would be no WordPress.
Execute the command below to start up the above Docker Compose manifest:
docker compose upsudo docker container list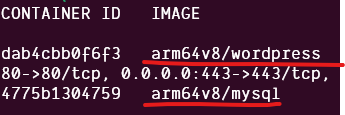
Now, if you’ve done everything correctly up to this point, you should be able to connect to the WordPress container via the created compute instance’s IP address. You can find the compute instance’s IP address in OCI. Keep in mind that the traffic between you (the client) and the server will be entirely unencrypted plaintext. If someone were to listen to the traffic, they would see everything (e.g., your WordPress admin credentials).
Configure TLS/SSL Encryption (i.e., HTTPS)
Approaches
TLS/SSL not only makes WordPress more secure for you but also for anyone using your site. Fortunately, you have multiple options when setting it up. Here are all the approaches that I know of:
| Approach | Difficulty | Security | Cost |
|---|---|---|---|
| self-signed certificates. | Hardest | Security depends on how you sign them. | Free |
| Trusted CA-signed certificates (e.g., Let’s Encrypt). | Hard | Secure. | Requires a paid domain from a Domain Registrar. |
| Cloudflare’s Flexible TLS/SSL protection mode. | Easy | For WordPress, this might suffice but comfort might come with a cost. | Requires a paid domain from a domain registrar. |
I’m personally a huge fan of Cloudflare. They provide massive amounts of services like hiding the ownership and tenure of a domain name, DDoS protection, and a free CA-signed certificate for a maximum of 15 years (after which it can be renewed for free). If you have a domain name (or plan to buy one), you might get off scot-free from all the complexity by using the Flexible protection mode mentioned in the table above. You only have to buy a domain from Cloudflare or register one with their DNS servers and flip it on. But be aware that it won’t provide end-to-end (E2E) encryption.
If you have the know-how and don’t want to buy a domain, you can walk the self-signed certificate path. Remember that out of all the aforementioned approaches, it’s the hardest one (in my humble opinion). With that said, I can point you in the right direction.
The Winner
My recommendation is to use Trusted CA-signed certificates. They not only provide E2E encryption but, contrary to self-signed ones, mark your website as safe to use. As I stand behind all my recommendations, this will be my path. For you to follow me, you must have a domain at your disposal.
Setting up CA-signed certificates
Reverse Proxy
When setting up TLS encryption it’s a good practice to isolate that responsibility to a wholly different server. I’ll be doing just that by setting up NGINX as a reverse proxy for the upstream WordPress container. Due to the intrinsic nature of TLS, this will take some additional work, but no panic! It’ll be over in a heartbeat.
sudo docker compose down
sudo docker run -p 80:80 -it --rm --name certbot -v "./data/certbot/conf:/etc/letsencrypt" -v "./data/certbot/www:/var/www/certbot" certbot/certbot certonly
After starting up the ephemeral Certbot container (depicted by the -rm parameter), you must fill in a short form. It’s very important that you answer “1” to the first question. Whatever your domain is will define the answer to the second (and probably last) question.
Afterwards, create a data folder and inside create a folder named nginx. Inside the nginx folder create the following file remembering to change the highlighted parts with your own domain:
upstream wordpress {
  keepalive 3;
  server wordpress:443;
  server wordpress:80;
}

server {
  listen 80;
  server_name example-domain.com;

  # Let's Encrypt has to perform Domain Validation.
  # It considers a domain validated, if it receives a
  # certain response (i.e., the challenge) from a well
  # known URL such as the below:
  location /.well-known/acme-challenge/ {
    root /var/www/certbot;
  }

  # Redirect HTTP requests to their HTTPS counterparts.
  location / {
    return 301 https://$host$request_uri;
  }
}

server {
 listen 443 ssl;
 server_name example-domain.com;
 ssl_certificate /etc/letsencrypt/live/example-domain.com/fullchain.pem;
 ssl_certificate_key /etc/letsencrypt/live/example-domain.com/privkey.pem;

 # Let's Encrypt's best-practice HTTPS configurations for NGINX:
 include /etc/letsencrypt/options-ssl-nginx.conf;
 ssl_dhparam /etc/letsencrypt/ssl-dhparams.pem;

 location / {
  proxy_pass http://wordpress;

  # If this isn't included, the upstream WordPress
  # server won't be able to serve content correctly.
  proxy_set_header    Host                $host;

  # Not hard requirements per se, but a good practice.
  proxy_set_header    X-Real-IP           $remote_addr;
  proxy_set_header    X-Forwarded-For     $proxy_add_x_forwarded_for;
  proxy_set_header   "Connection" "";
 }
}
This file will be your NGINX container’s single source of truth on configuration. In all honesty, NGINX is its own world altogether so I’m not going to delve into every teeny tiny bit as I’m probably as clueless as you. On a high level, this configuration will make NGINX act as a reverse proxy for upstream servers all the while encrypting the HTTP traffic making it HTTPS.
Fetching Best-Practice HTTPS Configurations
As these are included in the configuration file, we need to fetch them and move them to the appropriate directory. These files aren’t mandatory and can be omitted from the configuration but they’re recommended for additional security. Also, your SSL report from Qualys SSL Labs will be better.
sudo curl -s https://raw.githubusercontent.com/certbot/certbot/master/certbot-nginx/certbot_nginx/_internal/tls_configs/options-ssl-nginx.conf > ./data/certbot/conf/options-ssl-nginx.conf
sudo curl -s https://raw.githubusercontent.com/certbot/certbot/master/certbot/certbot/ssl-dhparams.pem > ./data/certbot/conf/ssl-dhparams.pem
Finalizing Docker Compose Manifest
Afterwards edit the Docker Compose manifest file accordingly:
version: '3.8'

services:
  wordpress:
    image: arm64v8/wordpress
    restart: always
    ports:
      - "443"
      - "80"
    environment:
      WORDPRESS_DB_HOST: db
      WORDPRESS_DB_USER: <DB_USER_HERE>
      WORDPRESS_DB_PASSWORD: <DB_PASSWORD_HERE>
      WORDPRESS_DB_NAME: <DB_NAME_HERE>
    volumes:
      - wordpress:/var/www/html
  db:
    image: arm64v8/mysql
    restart: always
    environment:
      MYSQL_DATABASE: <DB_NAME_HERE>
      MYSQL_USER: <DB_USER_HERE>
      MYSQL_PASSWORD: <DB_PASSWORD_HERE>
      MYSQL_RANDOM_ROOT_PASSWORD: '1'
    volumes:
      - db:/var/lib/mysql
  nginx-rp:
    image: arm64v8/nginx
    container_name: nginx-rp
    depends_on:
      - wordpress
      - db
    restart: always
    ports:
      - "80:80"
      - "443:443"
    volumes:
      - ./data/certbot/conf:/etc/letsencrypt
      - ./data/certbot/www:/var/www/certbot
      - ./data/nginx:/etc/nginx/conf.d
volumes:
  wordpress:
  db:
As you can see, the host computer no longer routes HTTP (port 80) and HTTPS (port 443) traffic into the WordPress container but to the nginx-rp container. The WordPress container still accepts HTTP and HTTPS traffic, which is why nginx-rp can route traffic to the defined upstream server (rows 1-5 and 35-46 in the nginx.conf).
Now you can start up the containers and hope for the best:
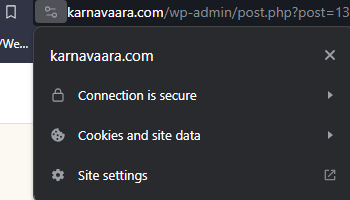
sudo docker compose upIf all goes well, you can now access your WordPress platform via a browser by using the domain name. For me (as you probably can deduce), it’s karnavaara.com. Also, you should now notice that the connection (to the left of the address bar) is secure and encrypted. However, we still need to configure automatic renewal as the certificates expire after three months.
Setting up automatic renewal
With the power of Linux this is more than doable(maybe even millionable). We can utilize Crontab (the instructor for the Cron daemon) and Bash scripts. Both are, of course, preinstalled on Linux distributions.
nano ./renew_certs.sh#!/bin/bash
# Maybe redundant, but I have PTSD.
cd ~
# Run Certbot's renew command in an ephemeral container called certbot:
sudo docker run -it --rm --name certbot -v "/etc/letsencrypt:/etc/letsencrypt" -v "/var/lib/letsencrypt:/var/lib/letsencrypt" certbot/certbot:arm64v8-latest renew
# Reload the NGINX running inside the nginx-rp container with the potential new certs:
sudo docker exec nginx-rp nginx -s reloadThis script basically renews the certifications if they happen to expire. Next, we’ll use Crontab to run this script automatically every 12 hours. Why 12 hours? Because this was Let’s Encrypt’s recommendation in the past.
sudo crontab -e0 */12 * * * /home/ubuntu/renew_certs.shI’m being honest here: This automatic renewal implementation is only theoretical, and I haven’t proven its feasibility in practice as my certificate hasn’t expired yet. It remains to be seen if this is practical. Though, I fail to see a reason why it would be impractical.
We’re all done here. You hopefully now have a working implementation of WordPress running on a domain of your choice with a front NGINX reverse proxy that encrypts HTTP traffic into HTTPS.
Go through the famous five-minute WordPress installation process.
This part is simple. The first time you open WordPress in a browser window via its URL, you must fill in a basic form. Invent an obscure username and a strong password that’s impossible to practically brute force.
If errors were to befall you, I’d wager a guess that you misconfigured the MySQL container in the Docker Compose manifest file. Ensure that the WordPress container’s database-related environment variables are correct. WordPress requires valid credentials to access the MySQL database.
Install plugins for security hardening, faster performance, and resilience.
There are thousands of plugins to choose from. This part is completely optional, although recommended as plugins provide your self-hosted WordPress instance with valuable functionality.
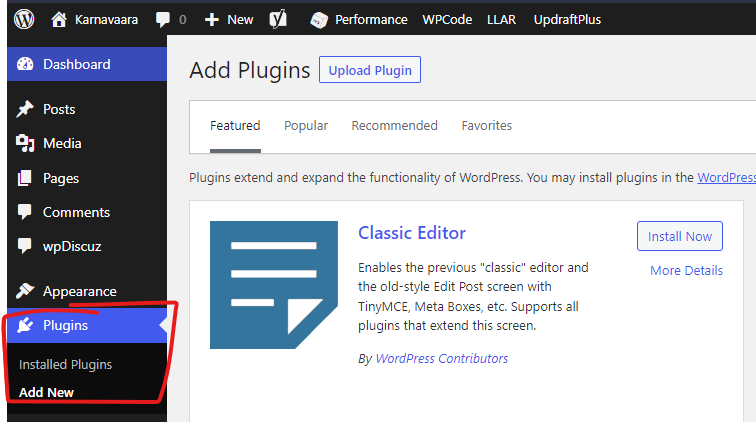
I wholeheartedly recommend you install at least these plugins:
- Limit Login Attempts Reloaded (LLAR) for security.
- It makes brute forcing much more difficult as this plugin can, for example, timeout IPs that exceed four login tries in under 20 minutes.
- W3 Total Cache for performance.
- This plugin can do a lot of things but as the name implies it caches your WordPress content. It can reduce server load through caching and content minification.
- UpdraftPlus for Recovery Point Objective (RPO).
- You can setup backups in OCI if you want, but it will increase your cloud bill (and is probably a bit overkill). You can use UpdraftPlus to implement your own RPO and without any cost (e.g., to Google Drive).
- A very important note to take into account is privacy. I don’t know how much UpdraftPlus respects it. If you process confidential and personal information, I’d probably trust more in Oracle than UpdraftPlus.
- WPS Hide Login for changing the default WordPress login URL.
- Even though LLAR protects against brute forcing, it’s not enough. It would be prudent to add another security layer. With WPS Hide Login we can implement Security Through Obscurity by obscuring the login URL.
- Security Through Obscurity is a bad practice. Still, it’s better than nothing because it can slow and demotivate malicious actors as they have to resort to a technique called fuzzing to find the login URL, which you have set as a custom and irregular one.
- “While not a standalone solution, security through obscurity can complement other security measures in certain scenarios.” –Wikipedia
Finalmente
And that’s it! My title stands as this should cost you only pennies. If you joined me for the whole journey, you will probably pay only for storage (mentioned here) and the domain. Of course, you could do this on your home server (also known as on-premises). But that could be far more complex and you’d be paying pennies for that(electricity) too if not more.
I’ll mention this the final time: make it a habit to use a secure password manager and put your SSH keys there. Don’t save them locally in plaintext! Trust me, they quickly pile up while being hard to manage. On top of a lack of management, they increase your attack surface. What happens if your device gets stolen? Or what about if the device gets broken? Or what about if you buy a new computer and forget about the SSH keys altogether?
Supplementary
- Consider this GitHub-esque theme (or maybe this zen theme), if you decide to try Hugo. ↩︎
- Maybe an insightful endeavor worth doing for a new sapling. ↩︎
- Also known as Karnavaara – the Forested Hill of Insight. ↩︎
- Though, paradoxically, there are still valid reasons to steer away from using Docker. You can, for example, opt-in to use Vagrant instead. ↩︎
- Docker images are Open Container Initiative (OCI) compliant. ↩︎